Armed Armed bands of the rear carrier. Restoration Armed bands of the rear carrier.
Hello, everyone, I had time without going through here, well the wait ended, this time will tell as gun brake system Four CB750 rear, so sit back and enjoy the function ..
is time for lights out.
Ingredients needed for this recipe
organic Tools
As you know, the tool will be our brains, our hands and patience necessary for the Gods or wise, (I'm not any of them), if we add a touch of skill and that what they are doing what they enjoy I'm sure everything will be fine.
Tools inorganic see photo.
A bit of fat and fibrous long clip, pictured a.
Photo A. Fat and clamp.

Parts you need.
course, you need spare parts or they can assemble explained in this section, the parties are:
1 - The carrier bands, the shaft that opens and closes the brake bands, cam actuated these bands with your pin 10mm, the original felt gasket, see photo # A.
Photo A

2 - The plate that holds down the inside of the shafts where they move the bands will also appreciate the security cupillas that hold the whole firmly and military authority, vero photo # b.
Photo B

3 - band brake with two springs, see photo # C.
Photo C

Steps to start assembly.
1-First we will place the shaft which drives directly to the bands and pervasive completely with grease.

2-Then we insert in place, the longer side in, and the short and streaked out ..

3-We took him to its limit, will naturally be some fat when you press on, we will remove the excess with a rag, I do this, it is not advisable to leave traces of grease inside the brake and I could fall in the friction zone of the bands and lose effectiveness braking, which can result in a serious accident.

4 - This is the opposite view as indicated in step # 3, the red arrow shows where the tip comes out striated.

5-Then if you look, there are two cylinders at the top of the slide-bands.

6 - As in the Step # 1, greased with
solvency. 
7 - It must look these cylinders, once they have been well greased

8-It's time to place the springs on each side, for it will place the top and bottom holes and insert each end of the docks.
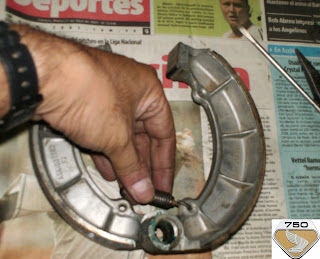
9 - We aligned the two brake bands, preventing us to go the two springs, it is easier to insert the top, indicated by the red arrow and then patience and some strength, begin to open the bottom half until they get the whole line ...

10 - ... with a little patience and a forceful, managed to separate some bands, until you hear the whole.

11 - Then look for the plate that secures the top of the bands ...

12 - ... because there is only one way to put it, is very simple.

13-If you appreciate good, there two small holes at the top of each cylinder, the same crossing the same ...

14-The purpose of these holes is to allow the passage of cupillas security, insert one and then another.

15-A have been inserted after the cupillas , as we turn each side of it in opposite directions and ready .

16-We felt the original seal, indicated by the red arrow.

17-We place the outer edge, indicated by the red circle ...

18 - ... and put the seal on his place of honor, see inside the red circle.

19-The final result should look like this photo.

For now, I leave you, but I assure you we will soon have a new explanation how I restored my faithful and lovely Geis


